|
I love onions. Such a mundane little vegetable – but it has such a pleasant shape and flavor, especially the Vidalia variety. Georgia has a right to be proud of that little onion. There is no onion sweeter and you can eat it like an apple – if you like onion flavored apples, I guess! Personally, I think the onion is a necessity in cooking because it makes all the difference in the world…well…second only to tons of garlic. I bet you’d love to have an up close and personal conversation with us at the OPC™ digs, eh? Onions are one of the simplest veggies to put in a garden. Cheap too! A bundle of onions costs around $1.50 to $4 and offers you anywhere from 50 to 100 sets. I usually put out two or three bundles. Row furrows are dug, fertilizer is sprinkled down the center of the furrows and then chopped in and covered to make a raised row. I plant my onions using a stick in one hand to make a hole and then dropping an onion set with the other hand. I then go back and pull the dirt up around each set using both hands (yes, I wear gardening gloves) which also straightens the onions to standing. In my neck of the woods, I have to plant them deeper than usual because our soil is a sandy loam and dries out really fast in our stiff winds. Once the onions are established, I pull the dirt away from them to expose the top of the bulb. Turning the soil between rows can be done by using a hoe, a mantis or a tiller or mulch can be used as well. This year, we had a dickens of a time keeping a really weird grass in check. Hand weeding around each bulb was a not fun necessity, but this has been an unusual year. The only other maintenance that we perform on our growing onions is pinching off any seed heads if they form and a side dress of 10/20/10 fertilizer every three weeks if there has been much rain. Otherwse, a series of soaker hoses does the trick. The nice thing about onions is that you can pick them at any stage of the game. Small onions are great for salads and garnish as ‘green onions’. Medium sized onions are wonderful to throw in with green beans or pintos or they can be left to expand to slicing size.  At the later stage of growth, onions have the soil pulled away from the bulb to allow the bulb free room to grow.  Eventually, the green tops start to fall over.  After the tops fall over, the onions are left for about two weeks before pulling.  Onions are easy to pull out of the ground.  We use 5 gallon buckets to gather our onions. Makes for easy carrying.  I wash my onions a few at a time in a big stainless tub/bowl or in another large bucket. After cutting off green tops no closer than 1 1/2″ from the bulb, I submerge the bulbs in water and use my hand to wash them back and forth.  I separate out sizes of bulbs and freeze the smallest ones for seasoning beans, etc. or cut them up for dehydrating. These I prepare, after washing, by removing the roots, the stem and the outer skin.  The medium to large ones are left whole to cure on racks for use as fresh onions. The roots and the stem will dry up and will be clipped. These onions will stay fresh until as long as November or December, stored in a cool dark place.  The largest are sliced and frozen on cookie sheets covered with wax paper and will be put into freezer bags. These will be used for homemade onion rings, for cooking on the grill and for use in casseroles.  Onions for dehydrating are chopped by hand because the food processor makes the pieces too small. The chopped onion is spead out on dehydrator racks. I start the process outside because the smell is overpowering and keeps you from crying. 🙂 After about 6 hours, I move the dehydrator inside.  After drying about 15 to 18 hours, depending on the moisture content, these onions are packaged into jars. Here, I have dried some of both our yellow and white onions. Storage for these dried onions is years. They are wonderful for using in soups and stews but you can also use them in chicken or tuna salad or for seasoning a cooking hamburger by putting a tablespoon or two into a bowl, covering with water and then placing into the frig overnight. You will have rehydrated onions to use like fresh! That is actually what some restaurants do. |
|
Oklahoma Pastry Cloth™ Company on Facebook
|
 |
Posts Tagged ‘freezing’
Processing Onions for Long-term Storage
Monday, June 13th, 2011
Hashbrowns! Yum!!
Friday, February 18th, 2011
|
Is Misspelled…  It’s closing in on planting time for potatoes! I love fresh potatoes from the garden and have done posts before on them. I am planning on doing a full bed of the knobby things this year. Usually, we only do a half a bed, but we were out of potatoes too soon this time. And of course, I’ll be drying some of them. But I have another favorite way to prepare potatoes for the long haul and I have been asked by reader, Shari, to share it here. Mr. Fix-It loves hashbrowns and it is easy to take a large batch of either garden potatoes or Russets from the store and make hashbrowns to last you a long, long time.  First cut up potatoes to fit into a food processor with a grating blade on it. You can also grate them by hand. Red and Yukon golds can keep the skins, but Russets are better peeled  Put into a food processor to grate or do it by hand  Once the potatoes are grated, put them into a collander that is in a larger bowl and pour water to cover the potatoes. Pick up the collander and swish it up and down. The water will be white and cloudy. Pour that off and do the same process until the water is clear. This washes off all of the starch that makes potatoes turn black.  Lay a large bath towel out on the counter and spread the grated potatoes over the towel.  Fold the edges of the towel over the top of the potatoes and roll the towel up like a jelly roll, pressing as you roll. This squeezes out excess water. When you unroll it, the potatoes will be dry.  Distribute the grated potatoes among cookie sheets and place in the freezer.  Remove from freezer and, using a spatula, lift potatoes off of the cookie sheets.  Place in plastic freezer bags  Bend the bags around to break up the slabs of frozen potatoes. Label bags and place in the freezer.  Your hashbrowns can now be used in any recipe calling for hashbrowns, even casseroles. To make old-fashioned hashbrowns for breakfast, put 2 – 6 tablspoons of oil (depending on the size of your skillet but barely covering the bottom), either olive oil or vegetable or coconut, in the bottom of a large skillet and heat on medium high. When heated, add hashbrowns to about 3/4 – 1 inch deep and salt to taste.  Cover with a lid and cook until the bottom of the potatoes is golden brown.   Cook until the second side is browned and crisp. Remove from the pan and pat with paper towels to remove any excess oil. Serve as a side dish. And don’t forget the grits!! |
|
Oklahoma Pastry Cloth™ Company on Facebook
|
|
|
All That Flowers is Not Hibiscus
Wednesday, August 26th, 2009
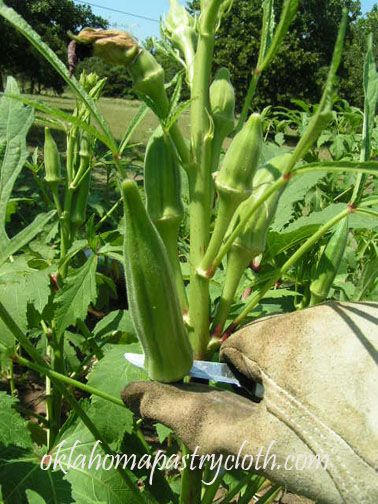
Cutting okra requires gloves and a long-sleeved shirt.

To test for toughness, make a slight cut into the pod. The knife should easily slice through the surface.

Okra flower

The okra pods will be various sizes and you can separate them according to the sizes for particular cooking methods. The smaller pods are great for boiled okra with butter and salt. The medium sizes are great for pickling and all sizes are suitable for frying and soups.

To freeze your okra for frying, cut the pods into bite sized pieces and place into a deep container that can be covered.

Add enough milk to the container to coat the pieces. I like to use buttermilk. Don’t worry about using too much, because you can drain off any excess.

Cover and shake to coat.

Next, add half a cup of flour and a half a cup of cornmeal. Cover the container and shake to coat the okra pieces.

This okra needs more covering so I will add equal amounts of more flour and cornmeal. I do not add salt until after I have cooked okra because salt can make the crust tough.


Cover and shake again. This okra is adequately coated.

Pour okra into shallow cake pans for small freezers, or onto cookie sheets for larger freezers and spread evenly over the surface. Freeze.


When the okra is frozen hard, using hands or slotted spoon, sift frozen okra and place into freezer bags and label. Freeze leftover coating for future okra.

Uncoated okra can be frozen the same way for soups and for the recipe that follows. Do not pre-scald okra to freeze, but just freeze it fresh off the stalk. Placing the pieces on a shallow dish to pre-freeze makes it easy to take out only the amount that you wish to use for each meal. The pieces are not clumped together in a big mess.
One of my favorite ways to make okra was taught me by my mother-in-law who never measured anything. She just brought a basket of goodies in from the garden and started throwing things together. Her version of “Okra and Tomatoes” is great. She used fresh tomatoes, onions, garlic and okra from the garden, but “store-bought” is just fine.
You need one good-sized tomato per person, chopped into small pieces
Around 6 medium okra pods per person
1 medium onion, finely chopped
1 clove garlic, minced
1 tbsp real butter or 1/2 tbsp olive oil
1/4 to 1/2 cup of grated or shredded parmesan cheese, depending on taste
Salt to taste

In a saucepan, saute onion in butter or olive oil until onions are transparent. I use olive oil.

Add garlic and stir.


Add tomatoes and okra and stir until heated.

Lower heat and cover to simmer until okra is tender – about 15 minutes. (a little longer for larger amounts)


Add salt to taste and quickly toss with parmesan cheese to taste. Immediately remove from heat and serve as a side vegetable.

Yummy! Dig in!
 Homestead Revival
 Paratus Familia
 Rural Revolution