 It’s getting colder in Oklahoma. Smoke is starting to waft from fireplace and wood stove chimneys and the sound of football games is filling our weekends. For me, it means racing (I am a turtle) from the car into the aquatic center, freezing in short pants and shirt over swimsuit, to spend an hour huffing and puffing at AquaDance in 8 feet of water, never touching the side or bottom of the pool for the entire workout. Then, I get to head back out to the car, as fast as I can hobble on a bad ankle and knee, wet and open to pneumonia!! My participation in AquaDance is supposed to convince the health insurance company that I value their admonitions to exercise and to make them feel terrible when I drown from exhaustion. But they won’t care. I don’t think they really care if I exercise. They just like to look down their noses at us regular folk and chide us for everything in life that makes life fun….like sitting in a movie theater with an extra large box of buttered popcorn, extra butter, watching a movie instead of treading water for an hour. Actually, I love AquaDance. I can’t wait for every workout. I feel like a fish and for that short amount of time IF the water is warm (and that can be a big IF) my joints are free to separate through gravity and suspension in the water, giving me amazing relief from pain after my disastrous fall at the post office 5 years ago. Yes, I did. Broke my ankle and both feet. But that’s another story. Unfortunately, while my swimming does burn hundreds and hundreds of calories, I have a tendency to replace every, last, one of them with comfort food. Oh yes, in the South we do love our comfort food. I thought I’d share my recipe for Fettuccine Alfredo that I promise is going to have you hugging yourself and speaking Italian after the first bite. A small amount goes a long way because it is rich and creamy and filling. You can use store bought noodles, but I strongly encourage you to make your own from my family recipe. They are not hard to make at all. I sure hope you enjoy this!! And you might want to think about joining a pool to work off the dinner. 2 recipes of Hightower Noodles 1 cup real butter 1 1/2 cup heavy whipping cream (you CAN use 1/2 & 1/2 but it’s not quite the same) 1/4 tsp salt 1/4 tsp pepper 1/2 tsp garlic powder 3/4 cup grated Asiago Cheese 1/2 cup grated Parmesan Cheese Juice of 1/2 Large Lemon Meat and Veggies of your choice DIRECTIONS: 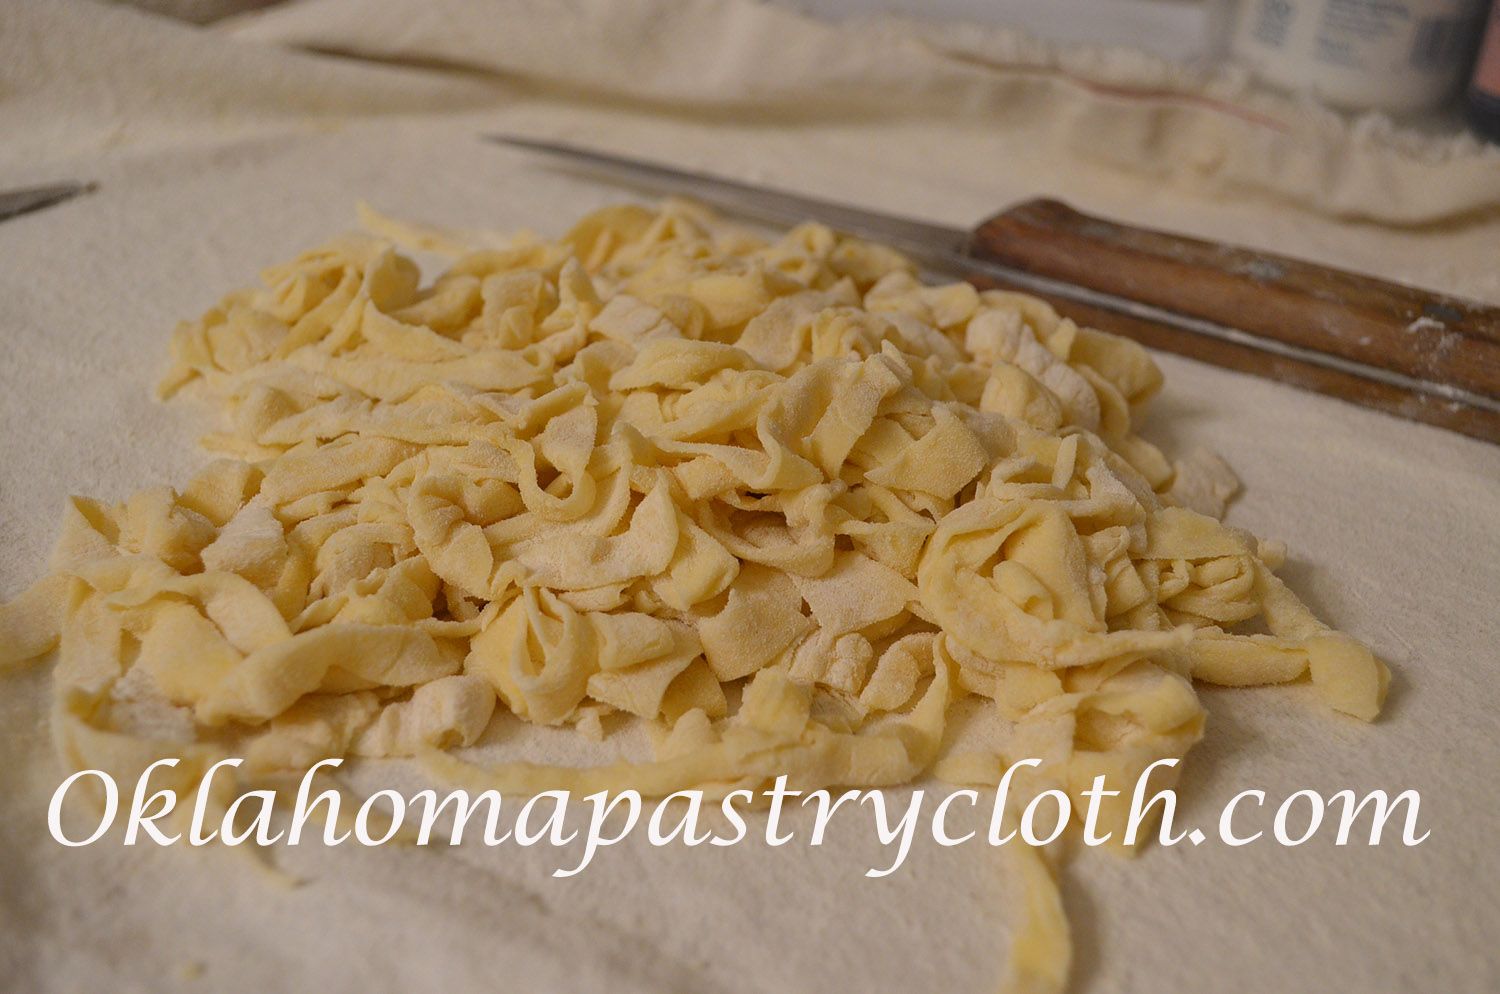 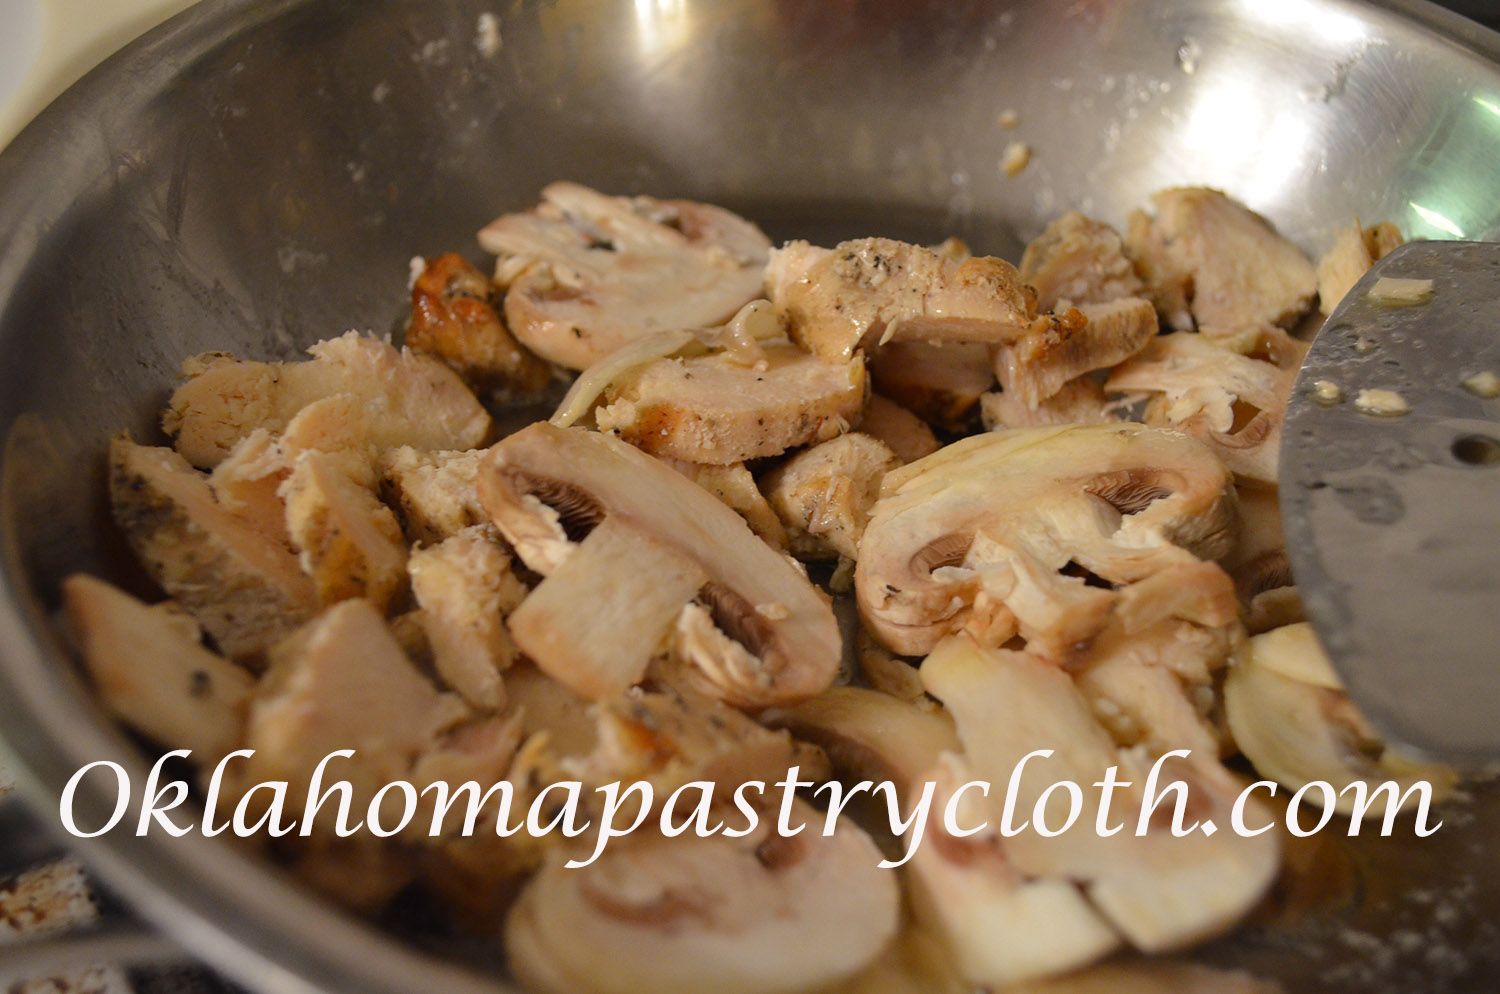 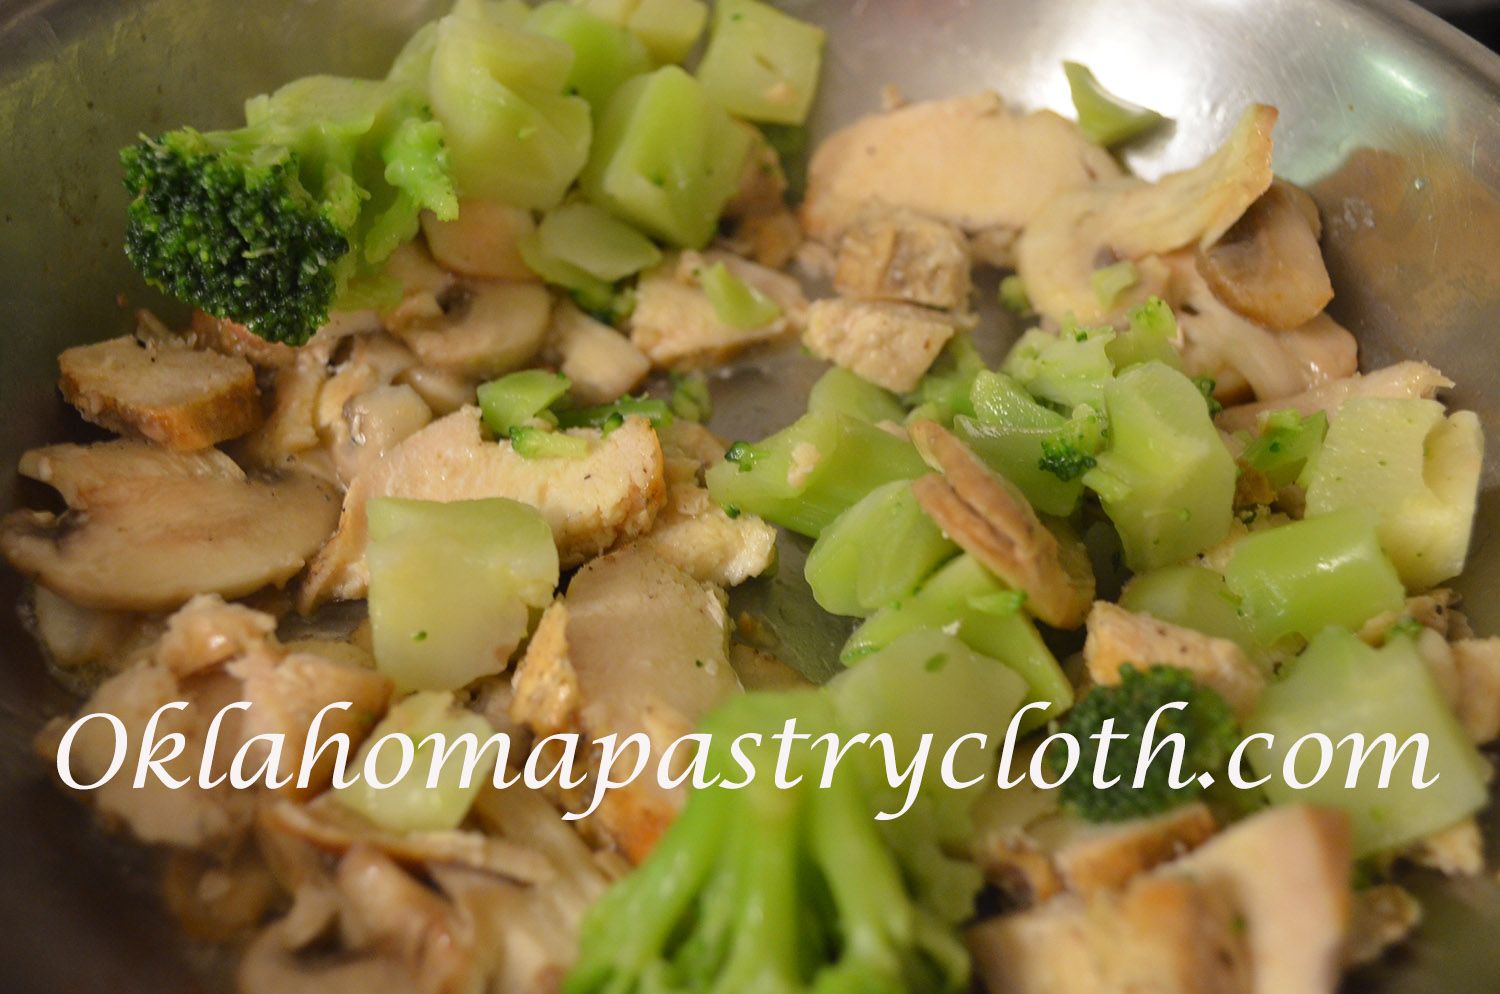 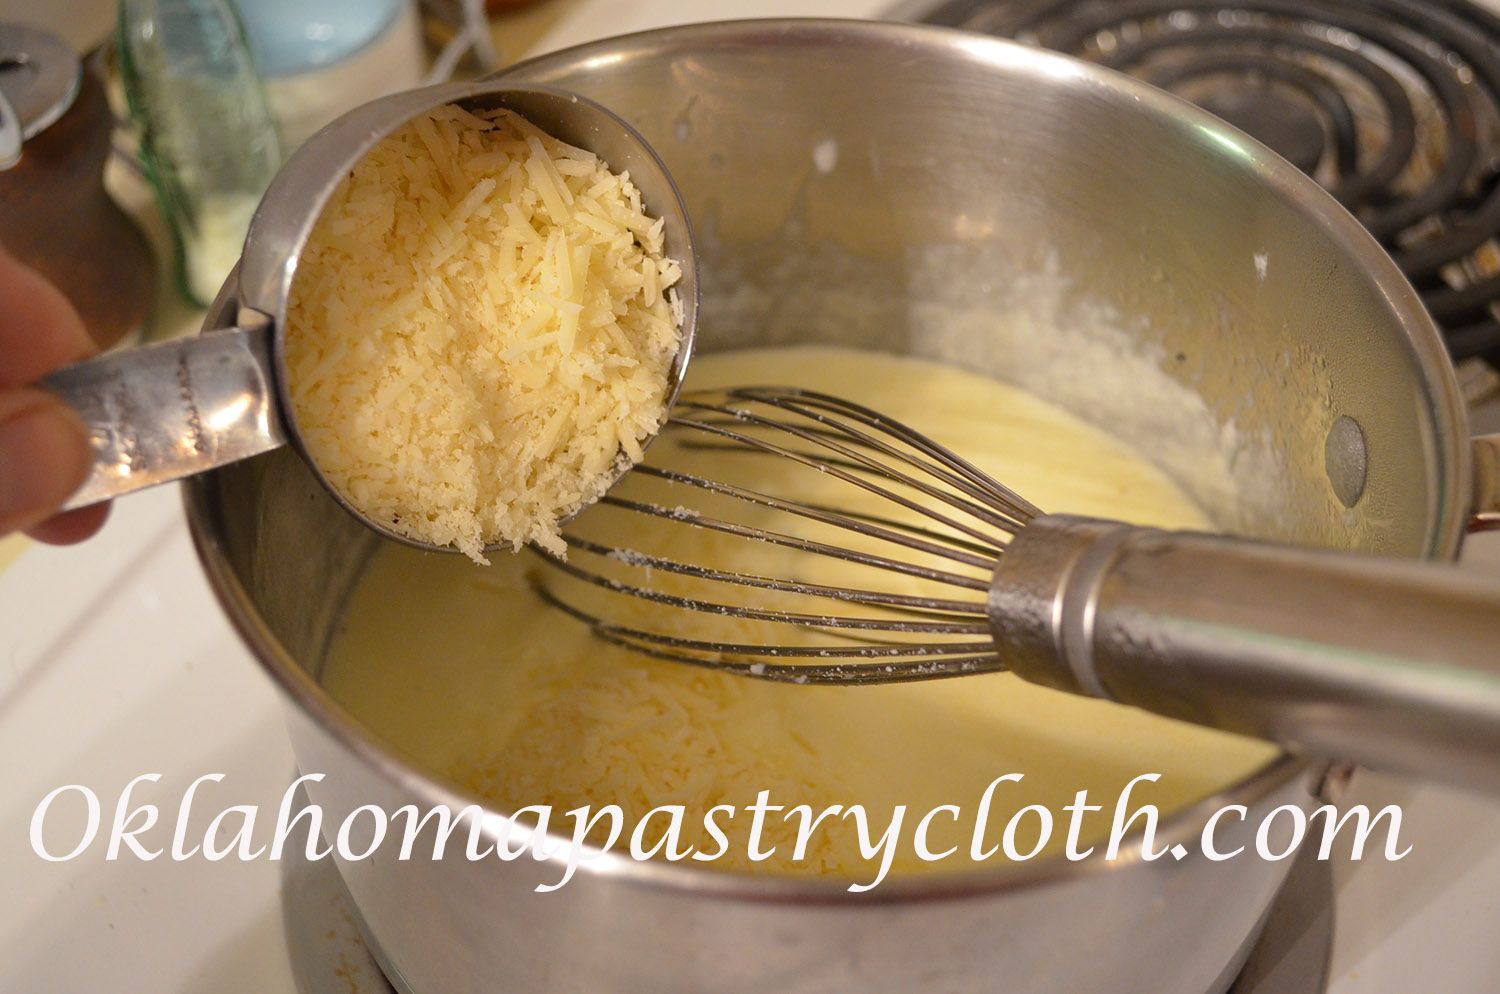 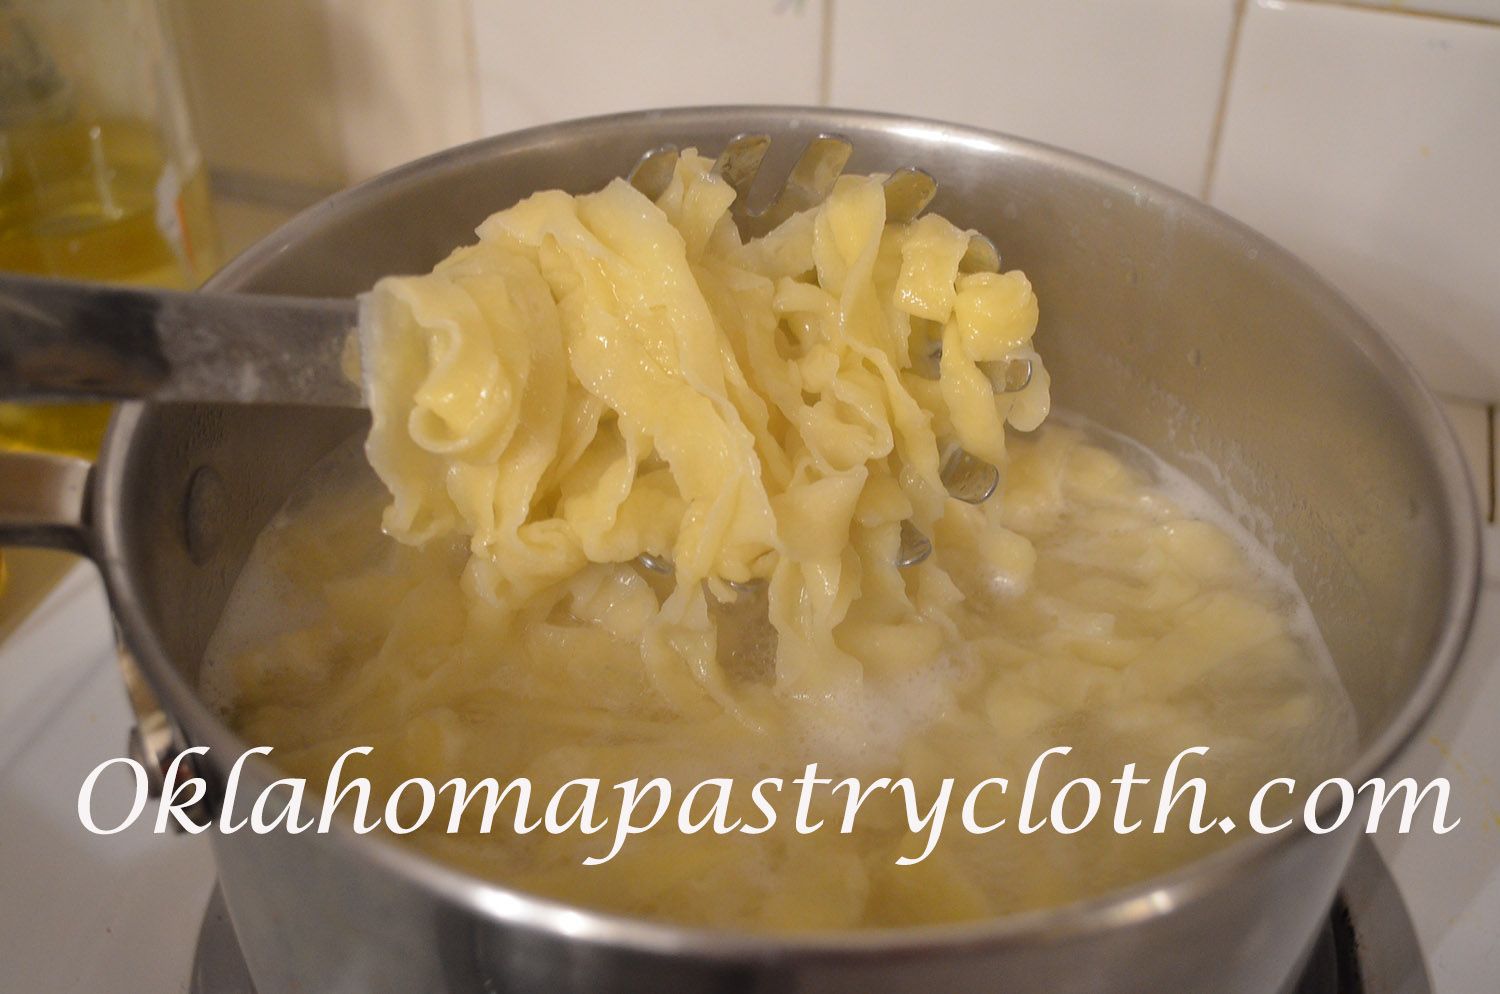  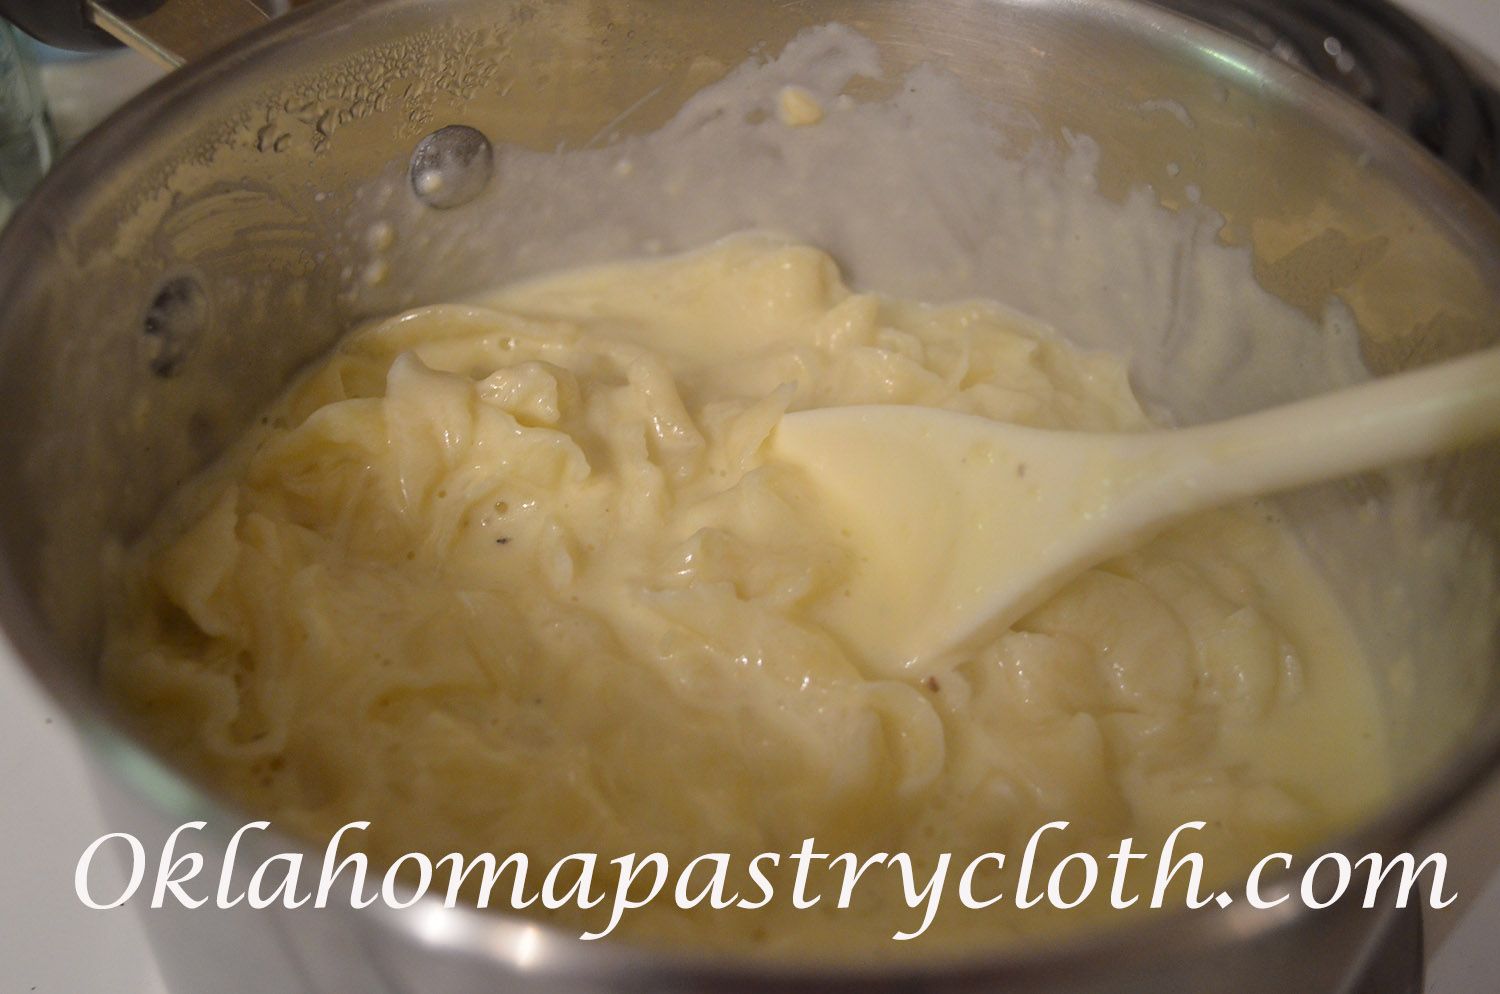   |
|
| |
|
Oklahoma Pastry Cloth™ Company on Facebook
|
Archive for the ‘Let’s Cook!’ Category
Fettuccine Alfredo with Homemade Noodles
Wednesday, October 17th, 2018
Ranch Style Eggs
Monday, August 14th, 2017
|
The Ranch, But…..   The beauty of living in Oklahoma is all of the different kinds of foods found across the state. Meals are impacted by the influences of the early pioneer and by the German influence and the Polish influence and the Swedish influence and the Italian influence and the Native American influence and, of course, the Mexican influence. No matter, where you go in the state, depending on the early settlers’ cultural background of the area , the foods are sensational and different. When talking restaurant foods influenced by the Latino culture we have Mexican, Tex/Mex, New Mexico/Mex and American/Mex but “At Home Mex” is a favorite at our home! And since breakfast is our favorite meal, I think that I need to share my own version of Ranch Style Eggs, also known as Huevos Rancheros. They are gooey, cheesy, luscious eggs that will start your day off with a bang or can make you a hit at a potluck brunch with friends. Since our tomatoes are still producing, I use my fresh tomatoes. However, you can use canned tomatoes and they are just as good. The recipe makes three eggs but you can double or triple the recipe into a larger casserole dish and do just fine. Ingredients:
 Saute onions in 1 tbsp olive oil with 1 tbsp melted butter until onions are just clear. Add green peppers and saute.  Add either diced fresh tomatoes  or add canned tomatoes. Stir and simmer.  Add soda and stir. A foam will form and just stir it down. The purpose of the soda is to cut the acid and any bitterness of the tomatoes. Add all of the spices and stir. Cook down until thick – about 20 minutes.  While the tomatoes are simmering, brush tortillas on both sides with olive oil and place into a casserole dish, overlapping to fit.  Evenly distribute the tomato mixture around the tortillas, leaving a well in the center of each tortilla. Make sure that the tomatoes form a circular barrier for the eggs that you will be adding.  Break eggs, one at a time and gently into the center of each tomato well.  Cover the eggs and tomatoes with cheese. I am using crumbled cheese here, but you can use sliced or shredded cheese as well. Bake in a 400º oven for 10 to 20 minutes, depending on how firm you like your eggs. Serve hot with sausage, bacon or ham.  |
|
| |
|
Oklahoma Pastry Cloth™ Company on Facebook
|
|
 |
Cowboy Eggs??
Monday, July 24th, 2017
|
It has been so hot in Oklahoma that the birds have turned the bird bath into a hot tub! 103º on Saturday with a heat index of 111º. Finally, yesterday we got a good storm and things have cooled down some. But I have a feeling, not for long. I’m making lots of cool meals on these hot days. Have you ever taken one of those tests where the very first question says to go to the last question and the last question tells you to just answer the last question and stop? How many of you actually did what the test told you to do? Or did you just go through the entire test and answer all the questions and THEN get to the last one? And did you feel like the dolt that you were? Yeah, well. That was me. I was “Miss Answer-All-The-Questions-NOW” dummy – but only the first time. However, it appears that I still have this block about reading directions. Two weeks ago, it was announced at church that we would have a potluck dinner July 23rd – yesterday. In the bulletin was a list that indicated the first letter of last names, divided into food groups. That way, there would be equal amounts of salads, meats, veggies and desserts. So, Saturday night, I was trying to figure out what I could make, right then, that would save me from getting up early on Sunday morning. I settled on Cowboy Caviar – my version. Yes. Cowboy Caviar. That’s what we call it here in Oklahoma. No, cowboys don’t lay eggs, but they can’t afford those expensive fish ones either. So there you go. Cowboy Caviar. I had taken a bunch of recipes for Cowboy Caviar and combined and removed and added to come up with my favorite method. I lovingly toiled over my project and proudly displayed the really large bowl of the tasty stuff to Mr. Fix-It. His comment was, “Isn’t that an awfully lot of Cowboy Caviar?” No. No it wasn’t. It was going to a BAPTIST church potluck lunch. Need I say more? I put the large bowl of ingredients into the frig to marinate overnight and began cleaning up. It was then that the thought crossed my mind that food groups had been assigned. Oh no. Hopefully, W was assigned to salads?? I ran to the computer, pulled up our church website and searched for the list. There is was. W….desserts. Great. And so, I got up at 6 am and threw together my favorite Old Fashioned Chocolate Pie. I grabbed a can of whipped cream, for the pie, and Mr. Fix-It and I transported a hot, chocolate pie – straight out of the oven – with the Cowboy Caviar to church, where I put the pie in the frig to see if I could get it cooled down in time. Long story short, we came home with an empty pie tin and an empty crystal bowl, all of the pie and Cowboy Caviar having been consumed. And then I took a nap. But I thought that I would share my Cowboy Caviar recipe with you because I bet you’d like to have something easy for a potluck dinner or for a great side on one of these really hot evenings.  Caviar Dressing: Directions: In a medium bowl, add all sauce ingredients and whisk until sugar is mostly dissolved. Pour over vegetables and toss well until all of the vegetables are coated. Cover bowl of Cowboy Caviar with plastic wrap and refrigerate 12-24 hours before serving. Serve with tortilla chips. |
|
| |
|
Oklahoma Pastry Cloth™ Company on Facebook
|
|
|
|
|
Easy Individual Turkey Pot Pies
Wednesday, September 21st, 2016
|
It isn’t Fall yet and it’s still hot here in Oklahoma but if the weatherman knows what he is talking about, cool weather is on its way. Shortening days and coming holidays mean lots of full days with not much time to cook on many of them. Planning ahead and making your own, simple freezer meals saves time and money! And what screams, “Simple – Easy – Fast” like pot pies? Pot pies were a treat when I was growing up. We knew that if my parents were going to go out and a babysitter was coming to corral us four girls, it meant pot pies for supper. My favorite has always been turkey. And so, when I finally figured out, “Heh. I can do this myself”, making the buttery meat pies ahead of time for freezing has provided a quick meal in a pinch. So, I am going to share my recipe with you. This is totally my own, original recipe and you can add to it anything you like – carrots, spices, whatever. But I like just plain, ol’ pot pie rather like the simple, English meat pies. If I were going to add anything, it would be a little fresh thyme. But even that is gilding the lily for me. Oh, and you can find the foil pie tins with lids at your grocery store with the other foil baking pans. So here you go: Printable Recipe Instructions: First, make sure that the pie crust mix is cool but not frozen. Mix 3 1/2 cups of Our Pie Crust Mix Recipe with 12-14 Tablespoons of ice water. Using tablespoons, you can add and stir and add and stir to keep from adding too much water. The dough should be a little sticky. Set aside.  Place the rolled crust into one of the aluminum pie tins and gently press it down to fit to the shape of the tin. Press the edges down around the edge of the tin and fill in any spots that are missing dough by cutting off extra and putting a little ice water on the area and then pressing the piece into place.  Fill pie shell with 1 cup of turkey mixture. Pinch off a smaller ball of dough and roll it into about a 6″ circle. Wet the top edge of the bottom crust with ice water and place the second crust over the first crust . Press the edges down gently.  Using a sharp knife, trim edges by cutting against the outside edge of the tin.  You can flute the edges of the crust by taking the end of a knife, pushing it against the outside edge of the crust toward your pinched index finger and thumb, pushing the dough into your fingers. Do this all the way around the pie.  Cut four vent slits in the top crust  Voila. A finished pot pie!  Cover with the plastic lid that comes with the foil pie tin.  Repeat this process to make 7 – 8 pies. Freeze or bake immediately.  To bake, preheat oven to 400º. Bake pies for 45 – 50 minutes if fresh and 60-65 minutes if frozen until golden brown and bubbly.  Allow to cool about 5 minutes before serving. The crust is flaky and the filling is yummy!! |
|
| |
|
Oklahoma Pastry Cloth™ Company on Facebook
|
|
|
|
|

Italian Cream Cake
Sunday, January 24th, 2016
|
The other cold-to-the-bones, dismal, misty night, Mr. Fix-It said he was really, really, really wanting a dessert. We aren’t eating many desserts since the discovery of my thyroid issues. Of course, Mr. Skinny Fix-It can’t eat anything if I can’t eat anything, right?! So, with the wood stove finally blazing, to make the house toasty warm, dogs sacked out around it like stuffed animals tossed aside, I decided to be nice and make him something special – an Italian Cream Cake. Ever since Sir Flying Ace’s and Miss Amelia Air-Heart’s wedding, Mr. Fix-It has been wanting another Italian Cream Cake. Only, he wanted it the way their wedding cake was – no coconut. It does make a difference – especially for those who aren’t crazy about coconut!! Now, you know me. I had to find out the background on Italian Cream Cakes and so I researched and researched and guess what. There IS no background on Italian Cream Cakes. This is the best I could come up with from Answer.com and a recipe book: “While the Italian Cream Cake has its roots in renaissance Italy, the first written record of it is first seen in Canada in 1913. It is not until 1937 that the first recipe of Italian Creak Cake surfaces in the Plano News from Texas. Over the years the recipe has grown more complicated, though it is adored for its endless flavor combinations.” And “Not much is known about the origin of the Italian cream cake. The recipe apparently first appeared in the southern part of the United States and was the creation of an Italian baker who had moved to the U.S.” Evidently, we rednecks are more crazy about this cake than are Italians. That would make sense since it is all about butter and pecans! So here is my version of the Italian Cream Cake. And just a note, I use my own, homemade bourbon vanilla which I’ll show in an upcoming post. Preheat oven to 350º Ingredients: Icing:
            |
|
| |
|
Oklahoma Pastry Cloth™ Company on Facebook
|
|
|
|
|
|
|

Ham and Egg Tostadas
Tuesday, July 21st, 2015
|
Last week, I shared with you the fact that, though one can think that one has all things under control, the reality usually rears its ugly head and one finds out that one has NOTHING under control! My dad used to tell about a professor at the University of Kentucky, back in the 1950s, who used to quip that as soon as you think you have control over anything, just take a big rock, hold it over your foot, drop it and then WILL it to stop. That will cure you of that illusion. BUT….I also have been taught to make lemonade out of lemons, or in this case, ham and egg tostadas out of ham that I didn’t get to serve! We love these breakfast yummies and the ham that I had to can after the disaster at our son’s rehearsal dinner has come in really handy! They are wonderful for a brunch as well and look so pretty on the plate.  Home canned ham is wonderful for this breakfast treat, but you can used any kind of ham you like. It just needs to be shredded or chopped. Toss 1/2 cup of ham, per person, into a hot skillet that has been wiped or sprayed with a little olive oil and toss until thoroughly heated. Remove ham to a bowl or plate and place in a slightly warmed oven.  Ingredients:  Add a tbsp. of butter and a tbsp. of olive oil to the skillet and heat until butter is melted.  Prepare one corn tortilla per person and place into hot oil for about 30 seconds. Quickly flip and allow to cook until puffy places start appearing. Pick up with tongs and transfer to a paper towel and pat to remove excess oil. Repeat until all tortillas are cooked. You want the tortillas to be tender, not crispy. Add more oil and butter as needed. Stack on a plate and place into the warmed oven as well.  In a bowl, add one to two eggs per person with 1 tbsp. of milk per egg. Add a dash of salt and pepper and whisk until well-scrambled. In the skillet that is still hot and has the remaining oil and butter in it, add eggs and stir to cook. When about half-cooked, add onions and green peppers. Continue stirring and tossing to scramble the eggs.  On each plate, place one tortilla in the center and top with 1/2 cup of ham. Add eggs, onions and green peppers on top of the ham. Sprinkle shredded cheddar or Monterey jack cheese over the surface of the eggs. If the cheese doesn’t melt right away, microwave for a few seconds to melt it. Add freshly chopped tomatoes and picante sauce. Garnish with fresh cilantro and sour cream or guacamole if desired. |
|
| |
|
Oklahoma Pastry Cloth™ Company on Facebook
|
|
|
|
|
|
|
Shout Out
Monday, June 29th, 2015
|
Heh all! Well, because of all your help, we got the votes we needed and qualified to be considered for the Mission Main Street Grant! I can’t thank you enough for all your support! We got way more votes than we needed! Now, I am long past due giving a shout out to a really amazing lady who is helping people all over the internet with her cooking channel. Hands That Cook offers all kinds of recipes, tips and demonstrations that are easy to follow. She has a wonderful knowledge of cooking skills and a heart to share them with those who wish to learn. Though she likes to remain anonymous, the videos and voice are warm and inviting and I know that you will get a lot out of them. She has a diverse following who obviously love her to pieces. Hands That Cook ordered one of our Oklahoma Pastry Cloths™ and it was certainly a pleasure working with her. She liked our product so much that she did a show about a 100 year old pie crust recipe that she uses while offering a great review of the pastry cloth. You can enjoy it here: It is so wonderful to see how our products are making life easier and pleasant in kitchens across the country and even in other countries. That is our goal!! We tried Hands That Cook’s recipe for pie crust and it was wonderful.  And of course it had to be an apple pie. Yummy! Thanks to Hands That Cook for a great recipe and a wonderful testimonial. |
|
| |
|
Oklahoma Pastry Cloth™ Company on Facebook
|
|
|
|
|

|
Left Over Fried Okra?
Thursday, August 14th, 2014
 Remember that we are celebrating the venerable tomato and to support our favorite tomato packagers, Red Gold Tomatoes, and along with out favorite chili creators, Willis Chili Seasoning, we are having a giveaway that will make your mouth water. The winner will receive a can of Red Gold tomato sauce, a package of Willis Chili Seasoning and a lovely Red Gold Tomato apron to wear while making chili. I know it is summer, but we eat chili all year round and it is one of our summer favorites. So leave a comment below and on following posts or previous posts and your name will automatically go into the drawing that will be held on August 20th. Good luck! I just thought I’d give you an idea during this okra season that will give you a little extra umph for your salad. I don’t know about you, but when I fry okra, I have just enough left over that I look at it and say, “Do I REALLY want to keep this? It isn’t enough for more than one person but I sure don’t want to waste it.” Well, you don’t have to waste it. Put the fried okra in a refrigerator dish or bag and keep it refrigerated. When you make a salad next time, put the okra on a cookie sheet and bake it at 350º for about 8 – 10 minutes (just long enough to heat through and crisp). Instead of croutons on your salad, add the okra. It gives the crispy of croutons but gives more fiber and is really tasty!!   So don’t throw that little bit of okra out! Enjoy it on your next salad. And don’t forget to enter the giveaway! |
|
| |
|
Oklahoma Pastry Cloth™ Company on Facebook
|
|
|
|
|
|
|
Fresh Tomatoes For Scrumptious Spaghetti Sauce
Saturday, August 9th, 2014
 To celebrate the venerable tomato and to support our favorite tomato packagers, Red Gold Tomatoes, and along with out favorite chili creators, Willis Chili Seasoning, we are having a giveaway that will make your mouth water. The winner will receive a can of Red Gold tomato sauce, a package of Willis Chili Seasoning and a lovely Red Gold Tomato apron to wear while making chili. I know it is summer, but we eat chili all year round and it is one of our summer favorites. So leave a comment below and on following posts and your name will automatically go into the drawing that will be held on August 20th. Good luck! Grandchildren are such a blessing!! They remind us of our younger days, teach us patience and understanding and give us hours of laughs and stories to tell for years. I have a friend who quips, “If I’d known having grandchildren would be so much fun, I’d have just skipped the kids and gone straight to the grandkids!” I won’t go THAT far, but I do love my granddaughter and her antics. Her name is Claire and she is 2 1/2 years old of mischief, curiosity, brains and snuggles. She has Mr. Fix-It (An-Daddy) wrapped around her little finger and the other ones too. She says, “Sit”, pointing to the floor and he sits immediately to play trains. Yep, trains. She is obsessed with trains – all trains – but Thomas The Train is her favorite. She will play for hours watching Thomas go ’round and ’round the track and I will spend days trying to get the stupid song out of my head!! ♪♪ They’re two, they’re four, they’re six, they’re eight….. ♪♪ And then, there was the other day, while spending the day with us, that Claire asked if she could take Thomas to bed with her for her nap. Thomas was evidently sleepy too. I said, “Of course!” and tucked them both into bed, with every pillow that I could find in the house put around her on that big bed so that she would not roll off. I tickled Claire with our routine, “Night, Night. Sleep tight. Don’t let the bedbugs bite” and shut the door to the bedroom.  It wasn’t very long before I heard my granddaughter wimper, then cry out and then, offer a long, pitiful wail. Quickly opening the door, I found the munchkin sitting in the middle of the bed with head down and Thomas the Train hanging from her head. It didn’t take me a second to figure out what had happened. I’m not totally dense. She had put the toy in her hair and turned it on. The wheels wrapped her hair around the axles and it was not a pretty sight!  I did NOT want to send my little precious home to her mother with a big chunk of hair cut out of her head and so I diligently pulled one hair at a time out of the train but eventually, hair got pulled and broken. Claire was amazingly still and did not make a peep. When I finally removed the toy she flatly proclaimed, “Thomas bite me.” Yep, he sure did! And as a result, Thomas would not run because of all of the hair wrapped into the wheels. But not to worry. Thomas has been saved. It took Mr. Fix-It and me working in concert to perform the delicate hair removal. A scalpel, fine tweezers and a screwdriver did the trick. I wiped Mr. Fix-It’s forehead and closed. And Thomas is now running around his little track. ♪♪…”Shunting trucks and pulling freight..red and green and brown and blue. They’re a really useful crew…♪♪ Claire has another favorite and that is Veggie Tales with Bob the Tomato. The other day, we went to the garden to pick veggies and she got so excited at the first large tomato that she spotted. “Bob!” she squealed and picked it, carrying it around lovingly, as if it were going to break out into the Veggie Tales song (which is also stuck in my head). We gathered many tomatoes and went in to make her other favorite thing, and mine, – spaghetti. Below is my recipe as taught to me by Marilina, a college student from Italy, who lived with us for a summer way back when I was in high school. It really is good! I promise. Don’t forget to leave a comment to enter the giveaway! Ingredients 12 tomatoes or 24 roma tomatoes 2 tbsp olive oil ½ cup chopped celery ½ cup chopped onion ½ cup chopped green pepper 5 cloves garlic crushed or chopped ½ tsp fennel seed 1 tbsp dried oregano or 2 tbsp. fresh oregano 1 tsp thyme 1 tbsp fresh basil or 1 tsp dried ¼ tsp black pepper 1 cube chicken bouillon ¼ tsp soda Sprigs of fresh parsley chopped ¼ cup fresh parmesan ½ lb Johnsonville Sweet Italian sausage or homemade Italian Sausage ** 2 tsp corn starch mixed with 2 tsp water. Directions  Drop tomatoes into boiling water just until the skins split on about half of them. Drain and drop into ice water until tomatoes are cooled. Skin and slice.  Brown meat in a sauce pan and place into a bowl to set aside. Saute onions, celery and peppers in olive oil until tender.  Add garlic and toss to release the flavor.  Add tomatoes and cover to cook for 15 minutes.  Add seasonings, basil, thyme, parsley, oregano and fennel seed. Stir. We love our herb garden with two different kinds of fresh basil (green and purple), thyme, parsley, rosemary, sage, oregano, spearmint and peppermint. The fresh herbs really make the spaghetti sauce spectacular.  Add soda. Stir. It will bubble up and fizz. Just stir into the sauce.  Add bouillon and parmesan and stir. Allow to simmer for 10 minutes uncovered.  Add meat and simmer 30 more minutes. Thicken with corn starch mixture or, if you like thinner sauce, skip this step. You can also allow this to simmer for several hours to reduce and thicken, stirring occasionally and making all ingredients become a uniform sauce, but I am giving you a quick meal alternative.  Serve over pasta and garnish with fresh, grated parmesan cheese and fresh parsley. |
|
| |
|
Oklahoma Pastry Cloth™ Company on Facebook
|
|
|
|
|
|
|
New Giveaway and Salad Recipe!
Wednesday, July 23rd, 2014
 It’s tomato season again!! I love, love, love home grown tomatoes. They actually have flavor!! And tomatoes are so good for you. According to Tomatofest.com • Eating tomatoes, ketchup, tomato sauce and tomato paste-topped pizza more than two times a week can reduce the risk of prostate cancer by 21 to 43 percent according to Dr. Edward Giovannucci of the Harvard University School of Public Health. • “The only nutrient that turned out to have significant preventative value (against prostate cancer) was lycopene,” writes Dr. Giovannucci who also found that lycopene was most efficiently absorbed into the body when accompanied by dietary fats (lipids). • “Cooking tomatoes in oil encourages intestinal absorption and results in a two-to-threefold rise in plasma lycopene concentrations,” • Men who eat two or more servings of tomato products average a 35 percent reduction in prostate cancer risk. • Tomato products are beneficial in aggressive cancers that have also spread to other parts of the body. • The best food sources of lycopene according to the Tomato Research Council in New York City: ( Amount of lycopene in one ounce) Tomato Sauce, Spaghetti Sauce, Ketchup (5 mg); Tomato Soup, Canned Tomatoes, Tomato Juice, Vegetable Juice (3 mg); Minestrone Soup, Vegetable Soup, Pink Grapefruit (1 mg) • Lycopene helps women guard against cervical intra-epithelial neoplasia, (CIN), tumorous tissue growth in the cervix according to research from the University of Illinois at Chicago. • Lycopene is a powerful inhibitor of the growth of breast, endometrium (inner lining of the uterus) and lung cancer cells. • Tomatoes are good for the eyes. Lycopene, the most abundant carotenoid in the blood serum, was found to be the key antioxidant that guards against ARMD ( Age-Related Macular Degeneration), a condition that may cause blindness. • Tomatoes are high in Vitamin A, Vitamin C, Calcium and Potassium • Lycopene is an inhibitor to heart disease. So there you go…eat your tomatoes and you’ll outlive Methuselah…well…maybe. To celebrate the venerable tomato and to support our favorite tomato packagers, Red Gold Tomatoes along with out favorite chili creators, Willis Chili Seasoning, we are having a giveaway that will make your mouth water. The winner will receive a can of Red Gold tomato sauce, a package of Willis Chili Seasoning and a lovely Red Gold Tomato apron to wear while making chili. I know it is summer, but we eat chili all year round and it is one of our summer favorites. So leave a comment below and on following posts and your name will automatically go into the drawing that will be held on August 20th. Good luck!  To make you hungry for tomatoes, here is something new that we have tried and love. I can totally admit that I am an Okie country girl. I’ve never been to Italy and, up until recently, I’d never heard of a Caprese Salad (you have to say “Caprese” with your hand slightly waving next to your cheek with your thumb touching your index finger to add emphasis). The daughter, Mrs. Wonderful Mommy, is well acquainted with this salad and rolled her eyes at my delight at my new find, but I had been totally ignorant of this epicurean delight. Evidently, (and the home school mom is now coming out in me) Insalata Caprese is a salad in the style of the island of Capri and is usually served as an antipasto (first course), not a contorno (side dish). Oh yeah. Wish you could hear this Okie accent butcher THAT! Insalata Caprese is sometimes called Insalata Tricolore, because it is the three colors of the Italian flag – red, green and white. It can include avocado as well. from Foodielady.wordpress.com We have had an incredible tomato season in Oklahoma with the wonderfully cool weather and my Roma Tomatos have done exceptionally well. I love to dehydrate Romas and, of course, they make superb spaghetti sauce, but they are great just to eat! So, when a friend posted a photo of a Caprese Salad on Facebook, I had to try it. As is usual with me, though, I had to add my own flair! A recipe? I don’t need no stinkin’ recipe. Ha! Usually, only a fine olive oil is drizzled over this fresh vegetable and cheese dish, but I gotta dress it up. So here is my version of a Caprese Salad. Ingredients: Red leaf lettuce and butter crunch or Green leaf lettuce One Roma tomato per person Package of Buffalo Mozzarella cheese (the very soft, fresh mozzarella) Fresh Basil leaves 1 Tbsp Olive oil per person 1 Tbsp Balsamic Vinegar per person ½ tsp Dehydrated garlic pieces per person Salt and pepper Instructions:  In a heated skillet, pour dried garlic pieces onto the dry surface with no oils. Quickly toss around with a spatula until pieces are lightly browned and toasted.  Mix olive oil and vinegar with a small whisk and add browned garlic pieces. Set aside. Cut thin slices of mozzarella and tear basil leaves into about 3 pieces. If the mozzarella is large, cut it into pieces that match the width of the tomatoes. Set aside. With each Roma tomato, carefully slice off the stem end of the tomato and then cut a thin layer, lengthwise, along what will be the bottom in order for the tomato to sit flat on a surface. Carefully make slices across the tomato, about ¼” thick, stopping slicing before you go all the way through the tomato. Gently spread the sections of tomato and insert a slice of mozzarella and basil between the tomato slices at the same time.   On salad plates, arrange torn pieces of lettuces to cover the plate. Place a stuffed tomato in the center of the lettuce. Drizzle 2 Tbsp of the vinaigrette dressing over the tomato, salt and pepper to taste, and serve.  Isn’t that pretty? And just to let you know, we went to a VERY nice Italian restaurant this week and there on the menu, under the salads, was “Caprese Salad”. I smiled very knowingly at the waiter and considered stating, “I know what a Caprese Salad is – (while holding my hand to my cheek with my fingers touching.) I make them alllll the time. I just don’t choose to have one at today.” I’m sure that he would have been duly impressed!
Veggies! |
|
| |
|
Oklahoma Pastry Cloth™ Company on Facebook
|
|
|
|
|
|
|
 Homestead Revival
 Paratus Familia
 Rural Revolution