 In-FLU-enza…H1N1…Tamiflu…all words that none of us actually care about or even think about – that is – until we stumble into the doctor’s office, eyes glazed, throat that could only feel worse for a fire eater and muscles that scream four letter words at us, as we try to use them. THEN, the flu becomes a reality and a reason to think seriously about finding a sky scraper from which to jump. Such was the past week for Mr. Fix-It and me. He succumbed first. I knew he was sick when he willingly grabbed his keys and left the house early last Sunday morning to hit up the AM-PM clinic for drugs. ‘Mr. Fix-It’ and ‘getting medical help’ are not usually in the same sentence. Since he only had a fever of 99.9, after a nose swab, Mr. Fix-It was rather taken aback when the doctor forced a mask over his face and admonished him not to go anywhere, including work, for 5 days. The doctor was stern in his warning and typed up a letter to give to the boss. He told Mr. Fix-It that he was highly contagious and so he came home, not entirely convinced that he was really THAT sick. But then, Sunday afternoon hit. My hubby was a mess. His fever was quickly inching to 104º and I was frantically making preparations to get him to the hospital. I had tried everything…tylenol, ibuprophen, tepid bath, alcohol rub and then I remembered an elderly doctor’s method quite a number of years ago when our son’s fever had gone to 105. I filled plastic bags with ice, wrapped them in towels and put them under Mr. Fix-It’s arms, on his stomach and on his forehead. Magically, the fever dropped to 102º. All evening I battled the fever and Mr. Fix-It’s irrational statements that let me know he was NOT all with me. By midnight his fever broke and he actually slept while I transferred myself to the couch, hoping to avoid the disease. About 3 am I woke up shaking from head to toe, teeth chattering so hard that I could not keep my mouth shut and throat literally shooting flames. Oh no. Somehow, I made it to the bedroom and crawled into bed next to my ailing husband. I figured that I might as well be comfortable now that I had caught the germs. Of course, I woke him up with my shaking and he crawled out of bed to get me some tylenol and water. I thought I was going to die. We figure that Mr. Fix-It brought the germs home from the VA Hospital where he had done a computer installation the week before. Ten days is the incubation period and it had been ten days since his visit. I am sure that I picked the germs up from his clothes or from him. Who knows? All I know is that neither one of us has had the flu in years and years and years and years and so the ferocity of the disease was rather disturbing. It has taken both of us over a week to get back to normal. But, as always, I could see that there was a humorous side to our plight. I made it to the doctor as well…just our family doctor…and I found out that just the word ‘flu’ nearly tatoos an ‘F’ on your forehead and hangs a sign around your neck that announces, “Unclean! Unclean!” I was told to wear a mask throughout my visit and the nurse who swabbed my nose (might I add that this is one of THE most unpleasant tests on the planet – because your sinuses are already swollen and raw without a q-tip being twirled around the membranes like a chimney sweep’s broom!) barely stuck her head back in the door and said through clenched teeth, “It’s flu!” And it wasn’t just the flu-flu. It was the BAD flu. As I left the room with prescription in hand, the cleanup crew was already disinfecting everything I had touched. Even the woman who checked me out, handed my Visa card back to me, washed her hands, grabbed the pen I had been using, disinfected it and wiped the counter right in front of me. As I stepped back, I felt like I had smallpox. I slunk past ogling patients, bemasked and humiliated. Two days later, still diseased and miserable, I needed to somehow get an order to a friend, who had come in from out of town. We discussed the logistics of this feat without germs and it was agreed that Mr. Fix-It, who was well on the road to recovery, would drive me to a designated meeting place. He did so and when we arrived, dear friend stepped around her vehicle and waved, at a safe distance of 50 or so feet away. Mr. Fix-It got out of our vehicle, placed the box of goodies onto the pavement of the parking lot between our car and Friend’s and proceeded to soak the box with spray Lysol: Bottom, sides and top. The contents had already been lysol’d. I was looking around for Homeland Security to come swooping in with a bomb squad and handcuffs for each of us. 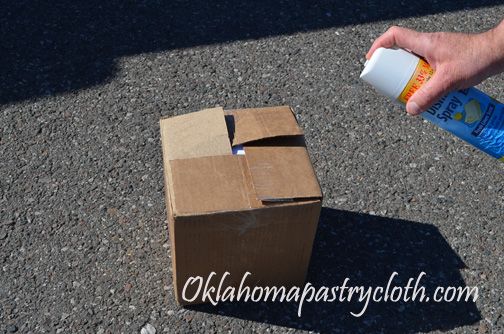 We got back into our car and Friend picked up the box to place in the back of hers. Hopefully, all germs were murdered by Lysol drowning. Now, I have to tell you that being sick is a boring state of being, but thanks to this same Friend, I was given a fun craft project that served to pass my time in bed and produce lots of little bows. She sent me an email with directions for making tiny bows that are so handy for a multitude of projects. And, heh, when you are running a fever and eating popsicles a new craft is a welcome distraction!! All you need is some 1/4″ ribbon, preferably a light weight or organza type, scissors and a four tined fork. 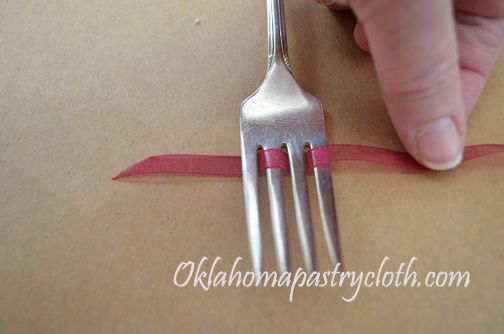 First, begin by running the ribbon under the first tine, over the second, under the third and over the forth. 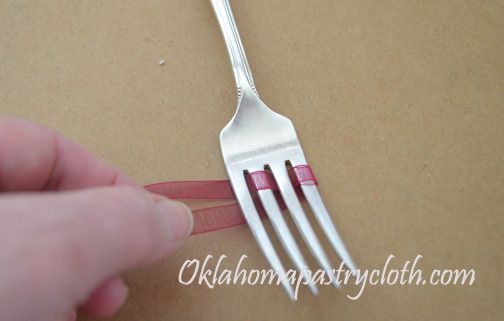 Pull the ribbon under the fourth tine and pull it all the way to the first tine. 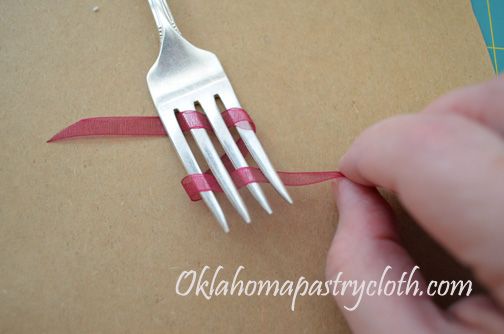 Now, go over the first tine, under the second, over the third and under the fourth. 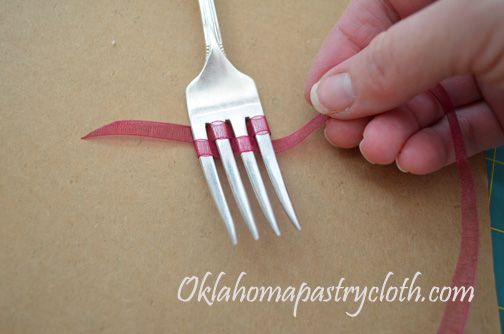 Push the ribbon up to the end of the tines to keep it tight. 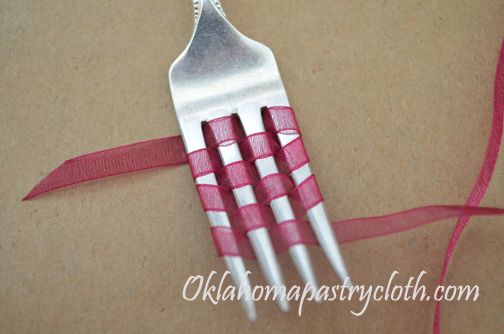 Continue the process until there are either two or three (depending on the size of bow you want) wraps around the outside tines 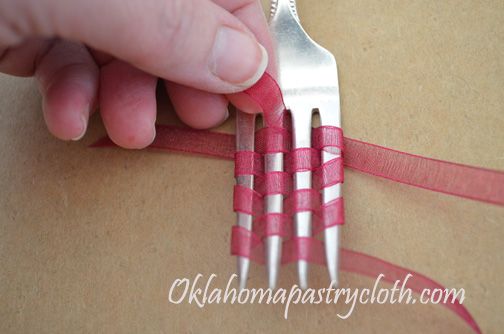 Clip the end of the ribbon that is attached to the spool and now run a fresh ribbon end up through the tines between the second and third one and in front of the first row of weaving 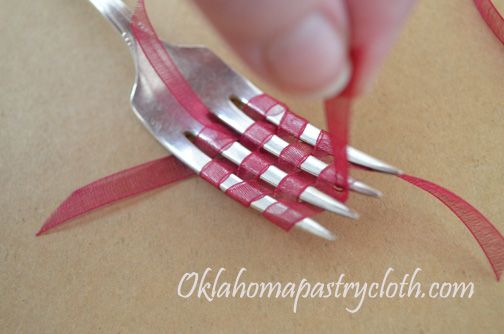 Pull up other end of this ribbon and clip off, leaving enough that will make it easy to tie  Pull the two ends up, gathering the center of the woven ribbon together, and tie at the center in a knot 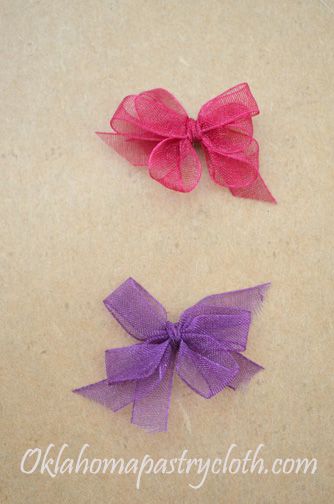 Slip the bow off of the fork and clip off extra ribbon. The bottom bow was done with two rows and the top one was done with three rows  Use to decorate cards, hairclips, clothes and anything else you can think of!  |
|
| |
|
Oklahoma Pastry Cloth™ Company on Facebook
|
|
 |
|
|
|
Posts Tagged ‘craft’
A Sick Bed Craft
Wednesday, February 20th, 2013
A Fun Project For the Kiddos
Monday, May 9th, 2011
 Friday afternoon, I had the pleasure of spending time with a precious group of home schooled girls who have formed a group called, “Keepers”. They are all ages and are polite, gentle, giggly and ready to tackle anything that is put in front of them. I was asked to do an art project with them that could be accomplished by all ages, even the very young, and so I decided that mock stained glass windows were just the thing. The beauty about this project is that there is no right or wrong to it and even tiny fingers can paint glue and tear paper. I loaded up the car with supplies, including a roll of newsprint for covering the dining table where we would be working. Most newspaper offices will sell you their end rolls of newsprint which offer you a plentiful supply of the paper for everything from covering tables to long murals for tempera paint. Our office charges by the inch thickness of paper on the roll.
 Cover the table with newsprint or an old tablecloth and place the stained glass pattern onto the table. Lay the plexiglas over the pattern and center. Place tape at either side of the plexiglas onto the pattern to hold the plexiglas in place. Using a Sharpie pen, trace the pattern onto the plexiglas. For thicker lines, go over the lines again. Remove the tape and pattern and turn the plexiglas face side down (side with the drawn pattern down).  Pour Elmer’s glue into small paper cup and add enough water to make it easy to paint – about 3 parts glue to 1 part water. Using a paintbrush, paint the glue mixture onto a portion of the traced pattern on the plexiglas. Tear pieces of tissue paper to fit shapes and lay onto the glue. Paint over the back of the paper, once on the plexiglas, with a thin coat of the glue mixture.  Offer lots of different colors  Continue painting each section of the drawing with glue and add different colors of paper according to what part is being completed. Be sure that the back of the papers are painted with the glue mixture as well.  This is one time that “staying inside the lines” has absolutely no application! Colors can overlap, glue can get splattered. It doesn’t matter.  Young children are really successful with this project because it does not have to be exact.  A dove is starting to emerge!  The youngest one has finished. A damp cloth easily removes any wayward glue. When the glue has dried, hot glue the plexiglass into the frame by placing little dots of hot glue in each inside corner of the frame. Display on a wire easle or add a hanger and hang in the window on a suction cup hanger that can be purchased at Hobby Lobby or Michaels. Be sure and choose a window that does not have direct sunlight as it will fade the colors of the paper.  They all did such a good job, don’t you think? This is an easy and fun project for kids of all ages. I hope that you get a chance to try it. |
|
Oklahoma Pastry Cloth™ Company on Facebook
|
 |

 Homestead Revival
 Paratus Familia
 Rural Revolution